Friday, December 23, 2011

Ella's Quilt


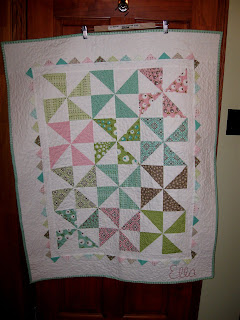
A few months back I showed a quilt I had made for Myah. Well her little sister, Ella, arrived late this summer and I set to work making a quilt for her. It took me a while to get the fabric and get it made, and even longer to actually find some time to get it to her as we start getting closer to the holidays.


I used a pinwheel pattern from Moda Bake shop and a layer cake of Ella’s Wishes from Collecting Threads. As soon as I heard her name, I knew it would be the perfect fabric!

It turned out great and I hope she likes it as I did!

Thursday, December 15, 2011

Christmas Presents

This year I am making a few Christmas presents, some are for my own friends and family and some I am doing for a friend to give away.

Among the things I have put together for my own friends and family is this lovely little tea wallet:


I used the pattern from Is It Naptime Yet?, which was great and really easy to follow, and came together very quickly.


A few people will be getting rice heating pads some packaged with baked goods, bath salts or creams. I created the pattern for this based off a heat pad I had picked up a few years ago from a craft sale.


It works fantastic for the upper back and shoulders. I love how it wraps around and the arms hold it in place.

My friend was lucky to be one of the recipients of the bag/neck rice heating pad earlier in the year and decided she wanted to do something for her friends. I had seen the Wellness bag and rice heating pads on Sew Mama Sew and decided to put together something similar for her.


She ended up with 2 sets of bags, each with their own coordinating drawstring bags to hold them. Each bag has card attached with instructions.


Each set included a neck/back bag, an eye pillow with removable cover, hand warmers and an all purpose bag (a mix between the Amy Buttler eye pillow scaled up and the Green Wife for the inside bag).


Hopefully the recipients get some good use out of these bags!

Tuesday, December 13, 2011

Frosty!


While playing around on pinterest (oh the time I waste on that!), I came across a recipe to make your own Wendy’s Chocolate Frosty. I love Frosties and find myself stopping for them even in the middle of a Canadian winter! How awesome would it be if I could make them myself at home? That and I am always looking for ways to get my ice cream maker into more use. I did have to cut the recipe in half and that was a good thing as it still made a lot, which of course was promptly finished in 24 hours.... I wouldn’t have been able to fit a full batch in my ice cream maker anyways, so it all worked out.

Ingredients:
½ tub of light coolwhip
½ can of sweetened condensed milk
2 cup 1% chocolate milk

Directions:
Combine all the ingredients in the icrecream maker and let run for 20 - 30 minutes depending on your maker and the desired consistency.

Serve and enjoy!


Reviews:
I loved this and couldn’t stop eating it. O remarked that it tasted just like a Frosty! We also decided for the sake of our waists, we should not keep the ingredients on hand, as it was so quick and simple to make things could quickly get out of control.

Sunday, December 11, 2011

Menu: December 12 - 17

Oh wow, it has been a long time since I have posted a menu. This has been due to a few reasons, mostly the coming Christmas season. I have been busy trying to get things planned, made and wrapped (more on that later). Also O has recently completed his first 1/2 marathon, so that was a crazy week as well!

I am not sure how long I will continue to post the menus, but will try to continue for a little longer, although I may have to take another break over the holidays.

Menu:
Monday:Stir Fry
Tuesday: Thai Chicken Bites
Wednesday:Lasagna/ manacotti
Thursday: Work Function
Friday: Cheesy Vegetable Chowder (new recipe from pinterest, will post after I have tried it)

Others: chips, crackers, hummus, antipasto, whatever Christmas food is around the house

Baking: No real plans, we will see what inspires me off the Christmas list.

Caramel Apple Pie


Note: Let me apologize for this picture, I was lucky to snack anything to get a picture before this was devoured by O and a few friends! I will try to get a better picture when I make this again in the coming weeks.

This is Owen’s favorite apple pie. I originally found it on Allrecipes as Grandma
Opies Apple pie
. I have made some changes over the years to suit out tastes more, and now it is the most requested apple pie I make, the main change I made is the addition of cinnamon - it isn't a true apple pie around here unless there is cinnamon.


Ingredients:

1/2 cup unsalted butter
3 tablespoons all-purpose flour
2 tbsp cup water
1/2 cup white sugar
1/2 cup packed brown sugar
1 tsp cinnamon
8 apples - peeled, cored and sliced (I like to use a slightly tart, baking apple)
Pastry dough for a double crust 9 inch pie


Directions:
1. Roll out the bottom crust of the pie and place in the pie plate.
2. Pile the apple slices into the pie crust, you want them so they mound slightly in the middle.
3. In a pot on the stove, melt the butter. Mix in the flour so that it forms a paste.
4. To the butter ‘paste’ add the sugars and water. Mix well and bring to a simmer until it thickens.
5. Add the cinnamon to the butter sugar mixture and pour over the apples in the pie crust.
6. Roll out and add the top crust (we use a full top crust with slits cut in it, but a lattice top works nicely as well if you like less crust).
7. Bake at 425F for 15 minutes, reduce the heat to 350F and continue to cook for about 35 minutes.

Note: This pie freezes well. Just wrap in tinfoil and place in the freezer after step 6. When baking it, don’t let it thaw, pop it right into the oven and add an extra 20 to 30 minutes to the cook time.

Reviews:
This pie always gets great reviews, and is always requested when I ask if I should make an apple pie.

Saturday, November 26, 2011

Cake Decorating - Flowers and Cake Design

I finished the second cake decorating class (and am signed up to do the third - Fondant and Gumpaste in January). Here is a look at some of the flowers I was able to make and the final cakes.

My Lily Cake


Cake with all the other flowers

I was lucky enough that my instructor showed us how to do a few things that Wilton had taken out of the class when they redid the course, so I also got to learn the rope border and the butter cream pansy (which is one of my favorite flowers I leaned to make).


I also did a little playing around with the leftover gumpaste and some online tutorials to make a gerber daisy!


Thanks Erin, can’t wait for the next class!

Tuesday, November 8, 2011

Apple Stars


These were my favorite snack as a kid, my brother and I would always ask our Dad for apple stars for our evening snacks. We didn’t always get them, and we usually fought over who got the one with the best “star” when we did get them. Eating these now takes me back to those memories and always makes me smile (plus I can always have the best “star” now that my little brother and I no longer live under the same roof). They are a quick, simple treat and not all that bad for you.

Ingredients:
1 apple
½ to 1 tsp brown sugar
dash of cinnamon

Directions:
1. Slice the apple in rings through the core, remove the seeds from the inside of the apple.
2. Lay the apple slices on a flat surface and sprinkle the brown sugar and cinnamon over the apples.
3. Serve and enjoy!

Menu: November 7 - 11

Sorry for being late with the menu this week, I am not sure what happened to my weekend. One minute I was getting ready for the weekend, the next thing I knew I was at cake decorating class on Monday night.

Tuesday: Bacon Ranch Chicken (slow cooker)
Wednesday: spagetti squash
Thursday: Steak and quinoa pilaff
Friday: Going out

Snacks and other: Red pepper feta dip, caramel apple pie, homemade frosty, veggies and dip, honeydew

Monday, October 31, 2011

The Halloween Cake

As promised here are the Halloween cakes I sent to work:

Owen's work minicake


Cake for my work

The bones, skulls, zombie arm and ghosts I made out of gumpaste. The pumpkins were bought at the candy isle and made into jack-o-lanterns with edible markers. The gravestones are chocolate mint cookies with white chocolate writing.

They were a huge hit at work, but the best part was when you cut into the cake as I had hid gummy worms between the layers!


And Abbey the Angel says Happy Halloween. Have a spooktacular night!

Sunday, October 30, 2011

Menu: October 31 - November 4

Happy Halloween folks! I can't believe October is almost over, yikes. It seems like only a couple days ago it was September. Oh well, here is goes for a menu:

Monday: Egg McMuffins
Tuesday: Leftovers/Fridge Fallout
Wednesday: Calzones
Thursday: Chicken Soup
Friday: Tacos

Snacks: Apples with caramel Cheesecake dip, pumpkin pie yogurt, apple stars, crackers, veggies and dip, fruit,

Baking: Apple muffins/loaf or cake and possibly caramel apples or apple cider caramels (I have a bunch of apples that need to get used up)

Happy Halloween!

I have been keeping busy in the kitchen this Halloween (and around the house - I finally have a yard to decorate!).

First up were my Tiger Tiger cupcakes - based of the classic ice cream flavour! They were a big hit (as long as you liked black licorice flavour).


To make them a little more in the spirit of things, I added little white chocolate skulls (made using a candy mold).


Then I had these cute cupcake holders around, and couldn't resist making some cupcake skulls with brains! I have a new favorite strawberry frosting recipe now as well, yum!


I also made some tombstones for front yard and carved a pumpkin:


And lastly here is a sneak peak for the Halloween graveyard cakes!


I had fun playing with the gumpaste for this cake - pictures to come tomorrow (trying to keep it a surprise for the folks at work!

Monday, October 24, 2011

Menu October 24 - 28

Alright, I am a little late with this again - I have no idea how I am so busy all the time, oops.

Anyways we aren't doing anything special this week, but at least we don't have so much going on that I am not cooking at all!

Monday: Grilled cheese/ leftovers
Tuesday: Pepperoni Feta Pizza
Wednesday: Lasagna soup
Thursday: Sausage and potatoes
Friday: Tarragon Chicken (new recipe!)

Snacks: Fresh fruit and vegetables, antipasto and corn chips, pumpkin pie yogurt, rice pudding.

Baking: Tiger Tiger Cupcakes (Hope they work out!).

Sunday, October 16, 2011

Cake Decorating

In September a friend from work and I decided to take a Wilton Cake Decorating course. It was 4 week of Decorating basics and was great to learn how to do some basic flowers and borders. Below is my work from each class (sorry about the horrible photos - the lighting in my house is horrible at 9pm and I never had any leftovers after work the following day).

Class 1: Cookies and piping basics. I didn't take pictures of these, oops.

Class 2: 2D decorating on a cake (I am not very good at this)


This was a spice cake with an apple butter filling. It was great.


Class 3: Cupcakes with Pom Pom flowers and Shaggy Mums

These were gingerbread cupcakes with a peach cream cheese filling. They turned out really nice and balanced out the sweetness from all the buttercream on top.

Class 4: Final Cake - Ribbon Rose, Wilton Rose and writing


It was a chocolate cake with chocolate buttercream. The middle of the cake really wowed people. It was made with my tasty fill wilton pans. The middle was a raspberry mouse.


We had so much fun with the first class, we have decided to do the Flowers and Cake Design class starting tomorrow!

Menu: October 17-21

So first let me appalagise for the lack of a menu last week. We ended up eating variations of leftovers from thanksgiving supper for most of the week.

This week is going to be a little weird food wise as well. I have to leave early for a class on Monday night and Owen has a clinic on Tuesday night. Then on Wednesday and Thursday I am at a conference and will be home late. That leaves us with basically Friday night for an actual sit down supper, yikes!

Monday: Stirfry
Tuesday: Egg Hashbrown Bake
Wednesday: O's Choice
Thursday: O's Choice
Friday: Stew or Pizza (depending on how work out from the week we are).

Snacks: Fresh fruit and veggies, hummus, fresh salsa, banana bread

Monday, October 3, 2011

Menu: October 3 - 7

Sorry for the delay, this weekend was a little busy with making apple juice and antipasto. So without delay here is this week's menu.

Monday: Sausage and spaghetti
Tuesday: Beef Roast and potatoes
Wednesday: Burgers and Corn
Thursday: Goose Breast and green beans
Friday: Meatballs and potatoes

Breakfasts = bagels and smoothies
Snacks = antipasto, fresh salsa, fresh peach dessert, veggies and dip, cookie dough hummus.

This week will also include a bit of baking getting ready for thanksgiving. I am doing all of thanksgiving supper this year - so I am going to try and at least get the desserts done early, so I also see some pumpkin in our future this week.

Saturday, October 1, 2011

Peach Vanilla Bean Jam


Vanilla Bean Peach Jam

I started making jam a couple years ago when my inlaws sent me a bunch of fruit. However I had always made jam using the pectin that you can buy in the store and the recipes they provided. This makes pretty good jam, but I have found that we end up with too much and it is a little sweet for me - tasting more like sugar sometimes than the fruit. So this year I decided to make jam without adding pectin. My first attempt (here) didn’t go so well and I ended up with fruit butter almost. But I kept going and ended up with this great jam from Smells like Home.


Ingredients:
3 lbs pealed, pitted and roughly chopped peaches
3 ½ cups sugar
1 vanilla bean, halved and seeded
1 lemon (juice of)

Directions:
1. In a large heavy bottomed pot combine all of the ingredients. If you don’t like chunks of fruit in your jam I suggest mashing the peaches a little.
2. Cook the jam on a slow simmer until the temperature reaches 120F (this could take a couple of hours depending on the sugar content and amount of juice in your peaches).
3. Remove the vanilla bean pods.
4. At this time I used an immersion blender to get rid of any chunks, but this is not necessary.
5. Ladle the jam into hot sterile jars and top with lid and ring.
6. Process if necessary by boiling for 10 - 15 min.
7. Check to insure jars sealed, if they didn’t just pop it into the fridge and eat it within the next few weeks.


Reviews:
Such pretty jam and it made the kitchen smell fantastic. It also tastes great, and you can really taste the peaches rather than just sugar that I find with most jams.

Friday, September 30, 2011

Cookie Dough Dip - Peanut Butter


I was playing on pinterest (my goodness what an addiction that is) and came across a recipe for a healthy cookie dough dip. I am trying to get some healthier snack foods in the house as i know I like to snack throughout the day rather than eating a large meal 3 times a day. the only problem with that, is that I tend to grab whatever is easy - which means I need to get my but in gear and have some healthy snack food on hand. This seemed perfect for the days that I am craving something a little sweet.


Ingredients:
1 can chickpeas
⅓ tbsp peanut butter
2 tbsp milk
½ cup brown sugar
⅛ tsp baking soda
⅓ cup chocolate chips

Directions:
1. In a food processor combine all ingredients,but the chocolate chips, and blend until smooth.
2. Mix in the chocolate chips.
3. Enjoy!

Reviews:
This is a great dip, that tastes a lot like a mix between a chocolate chip cookie and peanut butter cookie dough. You can’t even tell that there are chickpeas in there! I tried it on a couple people and they both loved it.

Sunday, September 25, 2011

Menu: September 26-30

This week is trying to clean up the odds and ends of things out of the freezer to make room for the new produce being harvested and processed now. I am trying to do a little more canning this ear and a little less stuff for the freezer, but we will see how that goes.

Monday: Ravioli
Tuesday: Grilled Chicken Salad
Wednesday: Perogies and Turkey sausage
Thursday: Steak, potatoes and corn
Friday: Travel Day!

Other food this week: Gingerbread cupcakes with peach cream cheese filling (for cake decorating class), peanut butter cookie dough dip (but healthy), fresh salsa and chips (from the garden produce), fresh fruit.

Thursday, September 22, 2011

Lemon Blueberry Cake

IMG_0672

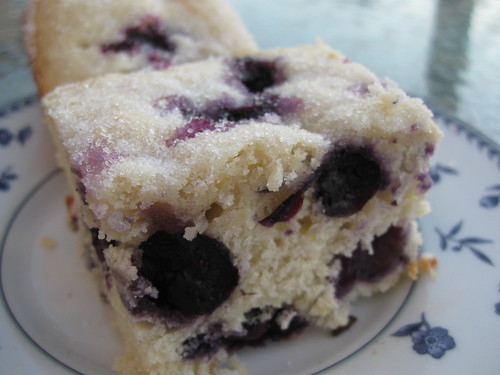
I had some fruit that was around leftover from the first fruit delivery of year and I decided to try a Blueberry Buttermilk Cake.  I had some lemon curd in the fridge as well that hadn’t gotten thick enough to fill cupcakes with and decided to add it to the cake.  What I ended up with was a wonderful moist lemon cake filled with fruit.

Lemon Blueberry Cake


Ingredients:

½ cup unsalted butter, room temperature
2 tsp. lemon zest or more — zest from 1 large lemon
3/4 cup + 1 T. sugar
1 egg, room temperature
1 tsp. vanilla
2 cups flour
2 tsp. baking powder
1 tsp. kosher salt
½ cup buttermilk
½ cup lemon curd
2 cups fresh blueberries

Directions:

1. Preheat the oven to 350F and prepare a 9x9 pan by lining with parchment paper or buttering and flowering.
2. In a bowl cream together the butter and ¾ cup sugar until light and fluffy.
3. Add in the egg and vanilla, mix until well combined.
4. Mix in ½ the flour and baking powder, followed by the buttermilk.  Then add the remaining flour and baking powder.
5. Fold in the lemon curd and blueberries.
6. Pour in the prepared pan ( you may have to spread it out to the edges as it is a thick batter), and bake for 35-45 minutes.  After 20 minutes remove from the oven and sprinkle the 1 tbsp of sugar over the top before you finish cooking.  Check if the cake is done by poking a toothpick into the middle (as long as you don’t hit a blueberry it should come out clean).

Variation:

Switch out the blueberries for raspberries for a yummy twist on this cake!

Reviews:

This cake got great reviews and quite a few people thought it was better with raspberries than blueberries.  I suggest going with the fruit you prefer.  

Even O who isn’t a huge cake fan loved this cake so much he ate a ⅓ of it in a single day.  Both times I brought it to work, I didn’t have any leftovers (and I didn’t have to work too hard to get people to eat it either!).

Sunday, September 18, 2011

Menu: September 19-23

Fruit arrived late last week (a little earlier than expected), so evenings this week will be a little busy getting things stored away. Thankfully I was able to get a bunch of things done this weekend (egg rolls, apple chips, canned apple pie filling, and apple peal syrup). Suppers will be fairly simple this week and lots of fruit!

Monday: Spaghetti bolgnese
Tuesday: Calzones
Wednesday: Tater tot casserole
Thursday: Ham Potato Soup
Friday; Fridge Fallout

Snacks: fresh peaches and apples, Spice cake, Apple Crisp, fresh peach tart

Tuesday, September 13, 2011

Pumpkin Pie Hummus


Fall is in on the way - it is getting cooler outside and the leaves are starting to fall off the trees. This time of year always has me wanting to make comfort food, start packing away food for the winter and bake. One of my favorite ingredients to play with in the fall is pumpkin. I was playing on Pinterest and saw some pumpkin dips popping up so I thought I would try and make a somewhat healthy alternative to pumpkin pie. I ended up with a pumpkin pie hummus - eaten on a graham cracker this really does taste like pumpkin pie, but full of protein, fiber and iron!

Ingredients:
1 cup chick peas (about 1/2 a can)
¾ cup pumpkin puree (not pumpkin pie filling!)
¼ tsp nutmeg
¼ tsp all spice
⅛ tsp ginger
1 ½ tsp cinnamon
1 tsp molasses
3 tsp maple syrup

Directions:
Combine the ingredients in a blender or food process and mix until smooth.

This is a starting point - taste it and see if you think it needs any more spice or sweetener, I change the amounts a bit depending on the day and what I am wanting.

I love this spread on graham crackers!

Reviews:

I enjoy this and a friend ate ½ a batch in one day and then proceeded to demand the recipe, so it must be pretty good!

Sunday, September 11, 2011

Menu: September 12-17

Things are getting busy in our house now. I am taking a cake decorating class starting this week, O is training for a 1/2 marathon later this year and hockey has started. This means we are going to be having more quick meals or freezer meals for a little while until we figure out the new schedules.

This week:
Monday: Pierogi
Tuesday: Lasagna soup
Wednesday: Supper out for O's Birthday
Thursday: Coconut curry chicken
Friday: Crouton crusted chicken

Other foods: We have pumpkin pie hummus, red pepper hummus, sugar cookies (decorating class), Monkey Bread (For O's Boss's birthday) and a Cake as yet decided for O's Birthday.

Sunday, September 4, 2011

Menu: September 5 - 9

September is here and with that cooler weather is supposed to be on the way, however it looks like we are going to get at least one more week of decent weather. I am hoping to make the most of it with some quick meals tonight that are easy to eat outside on the deck or in the park.

Monday: Pasta
Tuesday: BLT Pitas
Wednesday: Tzatziki chicken wraps, taco dip
Thursday: BBQ venison sausage and potato salad
Friday: Stir fry

Saturday, September 3, 2011

Banana Caramel PIe


I was playing around on Pinterest (oh so addicting) and say the picture for this delicious pie. My cousin was visiting and when she saw the picture, she declared we had to try making it. It also suits her style of cooking as you can get most of the ingredients premade.

Ingredients:
Graham cracker pie crust (homemade or store bought)
3 bananas
1 can of sweetened condensed milk
whipping cream/ whipped cream/ coolwhip

Directions:
1. Remove the label from the can of sweetened condensed milk and place in a pot of water (the water should cover the can). Boil the can for 2.5 hours.
2. Peal and slice the bananas. Layer the banana slices in the pie shell.
3. Pour the caramel from step 1 over the bananas and smooth.
4. Top with the whipped cream (whip this if necessary) or cool whip.
5. Place in the fridge to chill and set for 1 hour.


Reviews:
We all loved this pie, so yummy! It is rather sweet however and can be a little messy despite being in the fridge. If I made this again, I would also not put the whipped cream on until I am ready to serve it, as it got a little melted coming in and out of the fridge.

Tuesday, August 30, 2011

Mixed Greens with Apple Vinaigrette


I love the mixed green salad at Earls, it is apple in my salad! Yum! The dressing is tangy and sweet all at once. I can’t get to Earls for lunch very often (or my wallet would really hate me) so I needed to make this at home. I think I have come up with a pretty decent copy.

Ingredients:
Candied Pecans (from Suzie the foodie)
¼ cup pecans
2 tbsp water
2 tbsp sugar

Apple cider Vinaigrette (epicurious)
½ cup unfiltered apple juice (I used homemade, but you can buy this)
1 tsp honey
3 tbsp olive oil
2 tbsp apple cider vinegar

Salad

Lettuce (mixed greens work best, but I just use what I have in the fridge) (2 - 3 cups for single serving)
Feta Cheese (1 tbsp for single serving)
1 Apple (I use a gala as that is what we usually have in the house, but a tarter apple would be great)

Directions:
1. In a pot mix together the pecans, water and sugar. Bring the mixture to a boil and heat until most of the syrup is gone (don’t forget to stir!) This takes about 10 minutes. Spread on a pan to cool. (This can be done days ahead of time and stored in a container ready to top your salads).
2. In a jar/container mix together the juice, honey, olive oil and vinegar. Shake until well combined.
3. Rip the lettuce and toss in a bowl. Sprinkle with crumbled feta cheese, candied pecans (step 1) and thinly sliced apples. Pour 1 to 2 tsps of dressing over the salad and toss.

Reviews: I really enjoy this salad, it is delicious and perfect for summer. It isn’t exactly the same as the Earl’s salad but it is a good imitation.

Sunday, August 28, 2011

Menu: August 29 - September 2

This week is going to be busy, I have 3/4 of a box left to deal with, a 4l pail of blueberries and some raspberries, so I with all that going on suppers are going to be fairly quick meals this week.

Monday: Tacos
Tuesday: Grilled Steak and broccoli quinoa
Wednesday: Smokies and grilled asparagus with feta
Thursday: Goulash
Friday: Leftovers

Other food and snacks: peach ice cream, blueberries/raspberries and yogurt, roasted red pepper hummus, peaches (fresh)


Saturday, August 27, 2011

Chocolate Coconut Milkshake - For Grownups


Recently a few friends and I went out for supper at SodaJerks - and the best part was the grown up milkshakes. They were delicious, I have been wanting more since I left. Well the past couple of days have actually been warm (apparently summer has decided to finally make an appearance here) and I have been looking for something to sip while sitting on the deck in the evenings. I decided to try making my own mixes of milkshakes. this one was inspired by the fact that I had been playing with Malibu to make some cookies, and a hot chocolate that a friend of mine makes (she works at a coffee shop and mixes me up all sorts of drinks when she is bored).

“Grown up” chocolate Macaroon Milkshake
Ingredients:
3 large scoops of vanilla frozen yogurt
½ cup milk
1 tbsp chocolate sauce
1 tbsp Malibu rum

Directions:

In a blender mix together all the ingredients and blend until smooth. Pour into a glass and enjoy! If you are feeling extra indulgent, top with some whipped cream, chocolate sauce and shredded coconut!


Reviews:
I love this and it was perfect for a hot day on the deck. Owen also thought it was good and finished off the last ⅓ of it on me...

Wednesday, August 24, 2011

Pina Colada Macaroons


I have a friend at work who was leaving soon and so i wanted to make something special for her. I know that she loves Pina Coladas and so decided to try and make them in a cookie form. I had just come across the Papaya Mac Cookies by Joanne Fluke (found in Devils Food Cake Murder). I used this as my inspiration and as a guide to start my Pina Colada cookies.

Ingredients:
½ can (7 ounces) of sweetened condensed milk
2 ½ cups (7 ounces) unsweetened shredded coconut
2 tsp Malibu (Coconut Rum)
½ cup chopped dried pineapple
2 tbsp Malibu

Directions:
1. In a bowl mix the dried pineapple and the 2 tbsp of Malibu - you want enough so all the dried pineapple is in some rum, but the top layer should not be submerged. Let sit overnight ( you could probably get away with a couple of hours, but overnight is best).
2. Preheat the oven to 325F
3. Mix all the ingredients together in a bowl. The mixture should be sticky and should stay in shape when formed.
4. Spoon onto a cookie sheet (I covered mine in parchment paper as the dough is quite sticky). They do not spread so you can place them quite close together.
5. Bake for 15 to 18 minutes. They should be soft, but feel dry on the outside and the coconut on the top of the cookie should be starting to become a golden brown.
6. Cool and enjoy!

Reviews:
I first served these when I had friends over for supper and they were a big hit (more so with one guest than the peach pie!).

Sunday, August 21, 2011

Menu: August 22-26

It is that time again - time for me to figure out what on earth I am going to be eating for the next week. So here goes:

Monday: "Turtle" Burgers
Tuesday: Grilled Chicken and garden green beans
Wednesday: Egg "McMuffin", salad
Thursday: Grilled sausage and corn
Friday: Left overs/sandwiches (on the road)

Snacks/Desserts: Fruit salad, Veggies and Dip, Banana Caramel Pie.

There are no weekend meals again this week as we will be out of town. I am going to pick up some fruit and doing some canning at my parent's house this weekend.

Thursday, August 18, 2011

Myah’s Quilt


I have been drooling over the Just Wing It fabric for a while, and couldn’t figure out what I wanted to make with it, until I saw the McKinley Quilt. It was so cute, and I knew just the little girl to give this quilt to.


Using a charm pack of Just Wing It from Moda, this quilt went together very quickly! I decided to do a raw edge applique for the flowers (I wanted to practice for an upcoming project I have and the fact that that with a 4 year old and a new baby on the way, it would just be safer for my recipients than buttons).


I embroidered the little girl's name onto the quilt and used a fabric from the Just Wing It line for the back. I did straight line quilting to outline the boxes, and I think it turned out well.

I love how this quilt turned out and it’s new owner seemed to be pretty happy with it as well. It was quick to put together, and the tutorial was easy to follow.

Sunday, August 14, 2011

Menu: August 15-20

I had a friend request that I put up my weekly menu for a while to help her figure out what she was going to eat for the week. So here is the first week. The meals don't always stay on the assigned days depending on what time I get home and the prep time needed for the meal. Also in the summer I don't usually have meals planned for the weekends, as we tend to go places on the weekends more often than not.

Monday - Clazones
Tuesday - Breakfast "Burrito" (I will make extras for breakfasts for a few days)
Wednesday - Coconut Curry Chicken
Thursday - Grilled Ceasar Chicken salad
Friday - Tuna Melt

For snacks and dessert during the week will be blueberries with yogurt, and canned peaches with vanilla ice cream. Yum!

Thursday, August 11, 2011

Garden Update


Things are growing really well in my little garden. The first of the beans was ready today (sadly the dog stole it when I dropped it).

The peas have been coming for a couple days and are awesome. I haven't made any with them, as none have made it into the house before being eaten yet.


The strawberries have been going, and the pepper count is at 5 so far for green peppers and too many to count for the chilis!


Glueten Free Cherry Chocolate Pudding Cake


I have a friend who should not be eating a lot of gluten but she loves baking. She was drooling over the Cherry Chocolate Pudding cake that I made, so I decided to try making her a cake of her own (well actually I put her to work in the kitchen to show her how to do it). I also decided to make it a smaller cake, as it is a fairly rich cake and even with taking it to work with me it was hard to get through a 9 x 13 pan of it. What we ended up with was an 8x8 pan of gluten, egg and dairy free cake!

Ingredients:
¾ + 2 tbsp all purpose GF Flour mix (I used Kinikinik brand)
¼ cup organic whole brown sugar
3 tbsp unsweetened cocoa powder
1 ½ tbsp baking powder
3 tbsp coconut milk (you could also use almond, soy, or rice - I just had coconut on hand)
¼ cup applesauce (unsweetened)
1 cup cherries - rough chopped

½ cup organic whole brown sugar
1 ½ cup hot water
2 tbsp cocoa powder

Method:
1. Preheat the oven to 350F. (if using a glass pan cook at 325F).
2. In a bowl mix together the flour, sugar, ⅓ cup cocoa powder, baking powder, milk, and applesauce. (I had to add an extra 2 tbsp of milk, try mixing without before adding it. The batter should be thick but not dry).
3. Fold in the cherries.
4. Spoon the batter into a greased and floured 8 x 8 pan (or a pan lined with parchment paper).
5. In the same bowl mix together the dark brown sugar, hot water, and ¼ cup cocoa.
6. Poor overtop of the batter.
7. Bake 35 to 40 minutes (the cake will be set but not firm, you should see some pudding bubbling up on the edges.).

Tuesday, August 9, 2011

Chocolate Angel Food


I recently had a birthday, as seeing as how my birthday falls in August, I usually have ice cream cake. This year though, the weather has been cooler and I wanted something different. I wanted chocolate, but light and airy as it is summer. When I saw a chocolate angel food cake, I knew I had to make it!

Ingredients:
¾ cup all-purpose flour
¼ cup cocoa powder
¾ cup granulated sugar


¾ cup granulated sugar
12 large egg whites (make sure not to get any of the shell or egg yolk in with the whites or they won’t beat up properly)
1 teaspoon vanilla extract
1 ½ teaspoon cream of tartar

Directions:
1. Heat the oven to 325F.
2. In a bowl combine the flour, cocoa powder, sugar (3/4 cup) and set aside for a minute.
3. In a bowl with a stand or hand mixer (I guess you could do this by hand but there is no way my arm is that strong) mix the egg whites and vanilla. Beat the egg whites on medium high speed until they are frothy.
4. While beating the egg whites sprinkle the cream of tartar into the bowl mixing it in as you go.
5. Continue to beat the egg whites until soft peaks form (the egg white will come up with the beater if you remove it, but will flop over and not really hold its shape).
6. While beating the eggs slowly add the remaining ¾ cup of sugar and continue to beat until the eggs white become glossy and stiff peaks form (will hold a peak shape when the beater is removed).
7. With a whisk fold in the mixed dry ingredients.
8. Pour into an angel food pan (do not grease the pan, or flour it). Using a spatula smooth out the top of the cake.
9. Bake for 40-45 minutes (mine actually took about 55 minutes, but I think my oven might be a little off). The top of the cake should spring back when touched and the cracks should appear dry.
10. Let cool upside down (I stick mine on a top of a bottle or the top of the cake will get soggy).
11. Slide a knife gently around the pan to release the cake.
12. Enjoy

Reviews:
I love this cake! It is great without anything on it, but fantastic with strawberries and whipped cream. It was a great light birthday treat!
Friday, August 5, 2011

Birdie Stitches

I first came across the Birdie Stitches BOM from Little Miss Shabby when I was looking for something to make with my sunkissed fabric. I had fallen in love with the fabric, bought a bunch and couldn’t decide what to make with it. Embroidery isn’t something that I have done before, nor was it something that I thought I would be interested in doing, but I couldn’t get those cute little birds and the bright spring colors out of my head. So I decided to do a test run to see if I could 1. do embroidery and 2. if it would drive me nuts trying to do it.


I ended up with this cute little.... something.... I am not sure what to call it, but it is cute! I think it will end up being an oddly Shaped Mug rug, or might end up hanging as a teeny quilt in my quilting room, who knows. This did tell me though, that oddly enough I kind of enjoyed doing the embroidery.

With that knowledge and an upcoming vacation, I pieced together some blocks, printed the patterns, got myself a larger hoop, some thread and a water erasable marker. I have now been working on these blocks for just over a month (I started them on July 2 - really late) and this is what I have to show to date:


I am slowly catching up and can’t wait to see the final blocks and the final quilt. I love this quilt more and more as I work on it.