Tuesday, October 27, 2009

Peanut Butter Fingers


I love cookies that look like fingers for halloween, however O isn't a big fan of vanilla cookies. I decided to try them with peanut butter cookies instead, with the added bonus that pb cookies are close the skin colored if you use the right recipe.

The first time I tried, I used the same recipe as the Jack-o-lanterns. They looked fantastic before they went in the oven, but when they game out, the had flattened and ruined my pretty fingers.

I went searching and found a recipe for this purpose, Count Dracula Fingers! As I already had 3 batches of cookies in the house, and I didn't know if it would work I did a smaller batch and ended up with about 20 cookies

Ingredients:
1 cup + 2 tbsp all-purpose flour
1/3 teaspoon(s) baking powder
1/6 teaspoon(s) baking soda
dash salt
1/4 cup(s) unsalted butter, softened
1/4 cup(s) creamy peanut butter
1/3 cup(s) + 2 tbsp confectioners' sugar
1 large egg
1 teaspoon(s) vanilla extract
Egg white from 1 large egg, for brushing
Whole Almonds

Directions:
1. Cream together the butter and peanut butter. Once it is smooth and the sugar, vanilla and the egg, beating until well mixed.
2. In another bowl mix together the dry ingredients and slowly add to the butter and sugar mixture until well mixed.
3. Wrap the dough in cling wrap and place in the fridge for 30 minutes.
4. Take 1 tbsp of dough and roll into a 5 inch rope. Place on the cookie sheet and press an almond on the end for the nail. Using a knife press lines for the knuckles. Repeat until the cookie sheet is full. Brush the cookies with the egg white.
5. Bake at 325F for 18 minutes, let cool on cookie sheet for 5 minutes.
Enjoy.

Reviews:
This cookie recipe isn't as tasty as the jack-o-lantern recipe (there isn't as much peanut butter in it), however the cookies look good and creepy! I love the way they turned out. The only caution is that the nails tend to fall off if they are jolted to hard, so I am planning on "glueing' them with a little icing or melted chocolate.

This is what happens if you use the jack-o-lantern recipe to make the fingers:

Peanut Butter Jack-o-lanterns


I am in the halloween cookie spirit these days and wanted to try some other cookies, as I had so much fun with the spider web cookies. I wanted some quick cookies, and a friend suggested that I do peanut butter cookies. Peanut butter cookies are a huge hit in out house, so I thought this was a great idea. I grabbed a quick peanut butter cookie recipe that had a decent amount of peanut butter and got cooking.

Ingredients:
1/2 cup sugar
1/2 cup packed brown sugar
1/2 cup butter, room temperature
1/2 cup peanut butter
1 egg
1 1/4 cup flour
3/4 teaspoon baking soda
1/2 teaspoon baking powder
1/4 teaspoon salt

1/4 cup semisweet chocolate chips

Directions:
1. Cream together the butter and sugars. Then add the peanut butter and egg and beat until well mixed.
2. In a separate bowl mix together the dry ingredients. Slowly add the dry ingredients to the butter and sugar until it is just mixed.
3. Wrap the dough in saran wrap/cling wrap and place in the fridge for three hours.
4. Heat the oven to 375F, and make 1 tbsp balls on the cookie sheet. Flatten the balls with your fingers or the back of a spoon so they are smooth and cook the cookies for 8-9 minutes.
5. Cool the cookies on a rack. Once they are cool melt the semisweet chocolate chips, and put them in a plastic ziploc. Remove a small corner of the bag and pipe the melted chocolate onto the cookies to make faces.

Reviews:
This is a yummy recipe for pb cookies, and have been a big hit with everyone who has tried them. My students and coworkers loved the faces on the cookies, and mix of peanut butter and chocolate is great - who would have guessed??

Monday, October 26, 2009

Halloween Spider Webs


I saw these adorable cookies on Good Things Catered, and had to try them! I followed her recipe and directions and came out with some impressive cookies, I almost don't want to eat them. They are a tasty cookie, but not my or Owen's favorite.

These have been a big hit with coworkers and students.

Sunday, October 25, 2009

Mini Apple Pies


I was making a lot of apple pies, and had all the little trimmings of pie crust. Seeing them all sitting there in a big pile made it impossible for me to through them out. I had to do something with them. I didn't want to do anymore pies, and I am not a fan of overworked dough, so I made mini pies!

Ingredients:
Pie crust
1 apple
dash of cinnamon
Sprinkle of brown sugar
dash of flour

Directions:
1. Cut the pie crust into little rounds - this will depend on the size of the mini-muffin tin you have, but a 3" circle worked well for me for the bottom and a 2.5" circle for the top.
2. Mix the apple chunks, cinnamon, flour and sugar together (I just give it a quick taste to see if I like the mix - i find this better than any measurements as all types of apples will need varying amounts of sugar).

3. Assemble pies in a mini-muffin tin, crimp the edges and bake for about 20 minutes at 350F.

Reviews:
Everyone loved these little bite sized pies. They were easy to transport to people, you didn't need to bring along any plates or forks, as they could just pick them up and pop them in your mouth. Some friends have named the "Two bite Apple Pies" as they reminded them of two bite brownies.

Simple Apple Pie - For the Freezer

In the fall when apples are cheap (directly from the orchards) I like to stock up and make apple pies for the winter. It is great for potlucks and chilly nights to come home and just pop a pie in the oven, without the work of slicing apples and making pie dough. This is just a simple pie that I like to have in the freezer for those days. (I am really sorry for the no picture, they are all lost in the freezer)

Ingredients:
Pie crust for a double crust pie (I use the recipe on the tenderflake container for freezer pies, I find it freezers really well)
4 to 5 cups of apples
2 tbsp flour
½ tbsp cinnamon
½ to 1 cup sugar (depending on your taste and the sweetness of apples)
1 tbsp butter

Directions:
1. Roll out the pie shell and line a tin pie plate. Roll the top crust to have ready.
2. Peel, core and slice the apples.
3. Toss the apples with the flour, cinnamon and sugar.
4. Place the apples in the pie shell, and place cubes of butter on top.
5. Top with the top crust, and seal the edges. Cut a vent in the top.
6. Cover the pie with tin(aluminum foil) and place in freezer.
To Bake:
1. Place directly from the freezer into an oven at 450F, and bake for 15 mintues.
2. Turn the oven down to 350F and bake for an additional 45-60 minutes. If the top crust becomes too brown cover with the aluminum foil to finish baking.
Reviews:
Owen loves the fact that he can have apple pie anytime he wants – all he has to do (or I have to do) is put it in the oven. Friends have received frozen pies and have Loved them. The only unfortunate part is that odd shape of a pie takes up freezer space. You can also do this as a filling (like I have done for peach and apricot) and put into a fresh pie shell to conserve freezer space.

I have made about 15 of these this year, and many went to friends. I have gotten rave reviews from everyone who has cooked theirs so far!

Wednesday, October 21, 2009

Pie Crust for the Freezer

This recipe makes enough crust for 3 double crust pies, and as I am generally making at least that many when I am doing freezer pies, this is what I use. I am pretty sure that this is the recipe that is printed on the boxes of tenderflake. This has never failed for me and always comes out of the freezer with great results.
Ingredients:
5 1/2 cups all-purpose flour
1 tsp salt
l lb Tenderflake lard
1 tbsp vinegar
1 egg, lightly beaten
Water

Directions:
Mix together flour and salt.

Cut in Tenderflake lard with pastry blender or two knives until mixture resembles course oatmeal.

In a one cup measure, combine vinegar and egg and add cold water to make one cup. Gradually stir liquid into flour/lard mixture. You may not have to use all the liquid, add a little at a time until the dough clings together. (If it is really dry out, you may have to add an extra tablespoon of water)

Gather into a ball. Divide into six portions and wrap before placing in the fridge. I like to leave them in the fridge for at least 30 minutes before using them, then let them warm for 20 to 30 minutes on the counter. These will keep in the fridge for about a week.

Roll out each portion on lightly floured surface.

Tuesday, October 20, 2009

Pumpkin Cinnamon Rolls


A friend sent me the link to these buns and said they were great when I was looking for a good pumpkin cinnamon bun recipe. I decided to try it, but do to my family's dislike of fruit in their cinnamon buns I made a few alterations. I was pretty confident they would be good, as I have never had a problem with any recipe from King Arthur Flour!


Dough
1 cup canned pumpkin
2 large eggs
2 tablespoons to 1/4 cup lukewarm water*
1/4 cup soft butter
2 1/2 cups All Purpose Flour
1 3/4 cups Whole Wheat Flour
1/4 cup skim dry milk
1 teaspoon ground cinnamon
1/2 teaspoon ground ginger
1/4 teaspoon ground cloves, optional
3 tablespoons brown sugar
1 1/2 teaspoons salt
2 teaspoons yeast
*Adjust the amount of water by the time of year or your climate. For summer, or in a humid environment, use the lesser amount of water. In winter, or in a dry climate, use the greater amount. It's always best to start with the lesser amount; you can add more as needed.
Filling
1.4 cup butter, melted
¾ cup brown sugar
1 tbsp cinnamon

Directions
1. Mix all of the dough ingredients together and knead into a soft, smooth dough.
2. Let rise for 1 ½ hours (almost doubled) in a greased, covered bowl.
3. Place the dough an a lightly floured surface and roll it out into a rectangle (about 14” by 22”)
4. Spread the melted butter on the rectangle, leaving one edge free for sealing.
5. Mix the sugar and cinnamon together, and spread over the melted butter.
6. Roll the dough so that it forms a log that is about 22” long.
7. Slice the roll into 12 equal pieces and set each piece swirl up in a greased baking dish.
8. Cover the dish and let the rolls rise in a warm area for about an hour, until the rolls are puffy.
9. Bake the rolls at 350F for 25 to 30 minutes.

Reviews:
These smelled fantastic, and they must have been good, as the all seemed to disappear. The should be stored in an airtight container if you want them to keep very long, as I was told they were a little dry the second day. This could also be easily remedied (and make the buns a little more decadent) by adding some cream cheese icing as well.

Monday, October 19, 2009

Pumpkin Cream cheese Cookies


I like pumpkin, but pumpkin pie just doesn’t do it for me. I don’t know why, I like pumpkin pie, but it isn’t my favorite thing – however I am a fan of pumpkin cheesecake. So when I came across a pumpkin cookie with a cream cheese icing I was sold. It was also great as I needed some snacks to have around the house thanksgiving weekend. I found the recipe when I was checking out the new recipe sight Tasty Kitchen and decided to try it (with a few adaptations).

Ingredients:
For Creme Pies
1 1/2 cups All-purpose Flour
1/2 cup Brown Sugar
1/2 cup Sugar
1 cup Pumpkin (15 Oz.)
½ cup Vegetable Oil
1 whole Eggs
½ teaspoon Baking Soda
½ teaspoon Baking Powder
½ teaspoon Vanilla Extract
½ Tablespoon Cinnamon
¼ teaspoon Ground Ginger
¼ teaspoons Ground Nutmeg
1/8 teaspoons Ground Cloves

Cream Cheese Filling
½ a brick of cream cheese (softened – room temperature)
¼ cup room temperature butter
2 cups icing sugar (powdered sugar)
½ tsp vanilla
2 dash(es) Cinnamon
Preparation Instructions
Preheat oven to 350 degrees.
Cookies:
1. Beat together brown sugar, sugar, oil and pumpkin. Add eggs one at time, mixing well after each addition, followed by the vanilla.
2. In a separate bowl, mix together the flour, baking soda, powder, and spices.
3. Slowly incorporate the dry ingredients into the wet until just combined.
4. Using a pastry bag with a round tip, or a big zip top plastic bag with one corner snipped, squeeze out concentric circles of batter, starting from the middle and working outward until the circles are about 2 inches in diameter.

5. Bake until firm - about 11 minutes. Let cool on a rack before assembling.
Cream Cheese Filling:
1. Beat together cream cheese and butter. Add powdered sugar, vanilla and cinnamon.
2. Frost flat side of half the pies and top with another piece.

Enjoy right away, or chill overnight. These keep very nicely in the fridge for at least a few days.

Notes: I used a 96star tip and this made a great thickness of a cookie and nice swirls on the top, however I ended up with some aweful hand cramps from trying to pipe these out. I ended up with about 15 to 20 cookies once assembled.

Reviews:
This cookies were amazingly tasty and started disappearing before I even had them all assembled. They didn’t last long, and it was hard to get your hands on one the next day.
My family is a fan of anything that gives them an excuse to eat cream cheese frosting and they started stealing pre-assembled cookies and heaping on the cinnamon cream cheese frosting.

My father’s creations looked a lot like a heap of icing with a little cookie!

Sunday, October 18, 2009

Turkey Tips


So this thanksgiving I cooked my first turkey - completely by myself. I have never cooked a turkey before, I much prefer to leave it in the hands of the more experienced. Despite that however, my Mother left me on thanksgiving with a raw turkey and instructions to have dinner ready by 7. I came across the Food Networks top 10 Turkey tips and decided to give them a try along with a few tricks I wanted to try. It was an adventure all right.

How I made my turkey:
1. Make sure the turkey is cleaned out (remove the neck and don't forget the packet of gizzards - I unfortunately couldn't find this in my turkey turns out it was just in the other end).
2. I gently separated the skin from the breast with my hand and rubbed some corse salt, italian seasoning, and pepper under the skin.
3. Then I put the skin back down and rubbed the top of the skin with butter - I buttered the entire turkey. (oh it was delicious skin).
4. Cut an apple and an onion in half and stuffed them into the chicken.
5. Now seal up the turkey, I used a "lacer" which was basically a spiral of wire to close one end and then as there was a gap were a wing had gone missing I used a few needles.
6. Then as I am terrified of dry breasts, I covered them with tinfoil.
7. I put the turkey in the oven at 350 and left it for just under 3 hours, removed the tinfoil and left for another 45 minutes (It was a 14lb turkey and took just over 3.5 hours to cook).

Oh was this good. The meat was cooked and still utterly moist and juicy. Oh how I loved my turkey, and I was very excited that I didn't end up with an almost burnt or raw bird. I am no longer scared of the turkey (which is good, as I have a 16 lb one sitting in my freezer - thanks mom), and I hope that I will be able to repeat the juicy meat on my next try! The next challenge is to figure out how to carve the turkey, hmmm.

Saturday, October 17, 2009

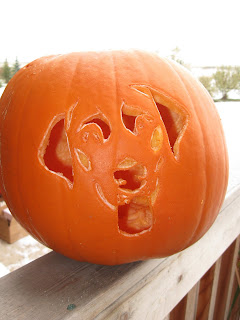
Pumpkin Carving


On our way home for thanksgiving, my brother and I made a pit stop at the grocery store and picked up a pumpkin. We hadn't carved a pumpkin together in years and thought it would be fun. I know it is a little early, but as we were at home together finally, it was really the last chance we would get to do it together before halloween. Who cares if my parents will have to another one before the holiday.

My little bro picked out the pattern (fitting for my parent's place as they raise dogs) and we got to work. It was so much fun, I hadn't carved a pumpkin in years. The true beauty is when the lights are out and the pumpkin has a flickering candle in it.


I love how it turned out! I am tempted to go and get some to try for my apartment, I could just set them outside my window right?

Friday, October 16, 2009

Maple Apple Pie


I wanted something a little special for thanksgiving dinner apple pie, as we will be eating apple pies a lot this winter. One of my friends sent me a link to her Maple Apple Pie recipe and I knew this is what I had to make – my Mom is a huge fan of anything maple.

Ingredients:
1- 9 inch unbaked pie shell
2 pounds apples, peeled, cored, & thinly sliced
1/2 cup plus 2 TBSP unsifted all-purpose flour (keep amounts separate)
1/2 cup REAL maple syrup
2 TBSP butter, melted
1/4 cup packed brown sugar
1 tsp cinnamon
1/3 cup COLD butter
1/2 cup chopped nuts (optional)

Directions:
1. Place rack in lowest position in oven & preheat to 400.
2. In a large bowl, combine apple slices & 2 TBSP flour. Toss to coat.
3. Separately, combine syrup & melted butter together. Pour over apples, mix well, & place in pie shell.
4. In a medium bowl, combine remaining 1.2 cup flour, sugar, & cinnnamon. Cut in the cold butter until cumbly. Sprinkle mixture over apples.
5. Bake 10 minutes then reduce heat to 375. Bake for an additional 35 minutes or until golden brown.

Reviews:
This went over really well with everyone who was eating the apple pie. Mom loved it as it had maple, and Owen liked it stating that it didn’t taste strongly of maple (which he views as a bad thing).

Thursday, October 15, 2009

Thanksgiving Dinner


I love turkey dinners – complete with all the fixings, and I love not cooking them. However, as a surprise this year, I was asked to cook dinner – all alone. My mother was not near a phone to answer questions, Owen had disappeared to work on his truck. I was in the house staring at a raw turkey on the counter and trying to figure out what on earth I was doing.
When in doubt – turn on the food network, luckily airing thanksgiving specials all day. So after putting a pie in the oven (I already knew what to do for that!), watching food network for a couple hours and googling turkey tips, I got to work and got that bird in the oven. I opted for a stovetop stuffing (from scratch), and just filled the turkey with some apples (yes there are still apples around) and onions.
Three and a half hours later I had a great dinner just finishing as everyone returned from their adventures.
Our menu consisted of: (recipes to be posted in the next few days)
Roasted turkey

Stuffing

Mashed potatoes
Green Bean Casserole
Steamed Carrots
Gravy
Flaky Butter Buns (these were from Mom’s Pantry line of frozen foods)
Maple Apple Pie

Pumpkin Pie
Key Lime Pie

Oh, and for snacking: pumpkin cinnamon rolls and pumpkin n’ cream cookies

Monday, October 12, 2009

Cheesecake Filled Strawberries


We got invited to go to a friend’s house for supper in the afternoon. Now what to bring, I always bring desert – but what on earth do I have time to make with only 1.5 hours from the time I get home until supper, and I needed to stop at the grocery store. Hmmmmm. I was in the middle of the cheesecake phase after having made mini freezer cheesecakes earlier in the week, and when I saw that strawberries were on sale, I knew exactly what I wanted to do. I know I have seen this someplace, but I can’t remember were, and I can’t find the post so I did my own thing.

Ingredients:
Fresh Strawberries
4 ounces (1/2 brick) of cream cheese
½ cup sugar
½ cup whipping cream

Garnish:
Graham cracker crumbs

Directions:
1. Wash and hull the strawberries, then set aside.
2. Beat the cream cheese until fluffy and smooth, then add in the sugar and continue beating until it is creamy.
3. In a separate bowl beat the whipping cream until it forms soft peaks. Fold the whipped cream into the cream cheese mixture.
4. Fill a pastry bag (or Ziploc bag with the corner cut out) with the cream cheese mixture and pipe into the hollowed stawberries.
5. Touch the top of the strawberries (with the cream cheese exposed) into the graham cracker crumbs.
6. Store in the fridge until you are ready to serve.

Variation: These would be great with melted chocolate drizzled over them as well.

Reviews:
These were delicious, I couldn’t stop eating them. This is a nice light cream cheese filling that isn’t too heavy and compliments the strawberry very well. Our friends enjoyed them and we had no leftovers to take home.

Wednesday, October 7, 2009

Apple Peel “Taffy”


After making 15 apple pies and a couple batches of cinnamon apple chips I had roughly 6 lbs off apple peel in my fridge. There was no way I could just toss them without feeling bad (“use everything” has been drilled into since childhood), so I searched out recipes. I was going to make apple jelly from them using the natural pectin that is supposed to be in apple peels. I say supposed to be as apparently I did something wrong and got no pectin. I had gotten to the point were it should have been jelling and it wasn’t happening. I used rubbing alcohol and tested for pectin, to find I didn’t have any. Well I had already put a lot of boiling time into the project, so I decided to see if I could just turn it into candy. This turned out to be an interesting candy with all natural sugars and colours (it is only apple peels and water) that was fun to make.

Ingredients:
Apple peels
Enough water to cover peels

Directions:
1. Put the apple peels and water into a large pot and bring to a simmer. Stir for a while until you can smell the apples, and taste it in the “juice”.

2. Drain the juice from the peels and run through a jelly bag.

3. Place the juice in a clean, heavy bottomed pot and boil until the temperature reaches 270F (soft crack stage). Note: this will take several hours and really depends on how dilute your juice is.
4. Pour the hot candy onto parchment paper or a silicone mat. Let the candy cool until it you are able to handle it, then butter your hands and pull the candy – folding, not twisting it.

5. When it is becoming to cool to pull, form it into a rope and let cool a little more.
6. Cut the rope into small pieces.

Reviews:
The candy was tasty, and even though I scorched the syrup a little it was still and interesting candy. The peels made the candy a nice dark red color that is great to look at.

Apple Butter

One of the suggestions I got from a few people when I asked what to do with apples was apple butter. I had never heard of nor tried apple butter before so this was a little interesting. I took out the Bernardin preserves book and got to work.

Ingredients:
3 lb apples cored, peeled and chuncked(I used a mix of 3 or more varieties)
1 ½ cup water
¾ tsp cinnamon
¼ tsp cloves
1 ½ cups sugar

Directions:
1. Put the 3lbs of apples and water into a pot. Simmer until the apples are softened.
2. Transfer the apples to a blender or food processor and blend until smooth.
3. Combine the puree, cinnamon, sugar and cloves together in a pot and bring to a boil then turn down the heat (trust me, you do not want this boiling once it starts to thicken!)
4. Let simmer on the stove until thick and brown. It should be smooth and spreadable. This took me about 5 hours.

Reviews:
This is basically a thickened and reduced apple sauce. My jars are packed away in the pantry awaiting some pork later this fall. My mother got the pot scrapings which she ate on toast, and is now planning on making her own with some of her apples (we delivered over 40lbs to her).

Tuesday, October 6, 2009

Pressed Apple Juice

I am a big fan of apple juice, I use it my smoothies, I drink it and it never lasts more than a day or so around our house. With that said I am always on the look out for ‘the best’ apple juice. After a bumper crop of crab apples last year my parents made some pressed apple juice, it was delicious. I knew I had to use up some of the apples quickly, so I took them out to my parents and my Dad and I got to work making juice.

Ingredients:
A mixture of sweet and tart apples (I used about 30lbs of apples for this, and I did use some macs which are not the juiciest of apples.)

Directions:
1. Make sure the apples are clean.
2. Half or quarter the apples and them turn them into a mash. To do this we used a sterilized meat grinder.

3. Put the apple mash into the into a cloth, with this large number of apples we used a pillow case.
4. Apply pressure to the apple mash to extract the juice. To do this we used a sterilized sausage stuffer, which worker fairly well, as they do require a lot of pressure if you want to get all the juice out.
5. Pour the juice into sterilized jars and place the lids on. (Note the apple juice will be very brown at this point as nothing has been added to stop it from reacting with the air. Don’t worry, it won’t affect the taste.)
6. Process the jars in boiling water for 20 minutes. The juice will become lighter in color after processing.


Reviews:
From the approximately 20 pounds of apples, I got 6.5 quarts of juice. The juice is very strong and could be diluted with water if you wanted, but I wanted a strong juice and left it. Upon trying this O commented that it tasted just like an apple – that is a good start considering it is made from nothing but apples! Due to all the gala apples I used, I now have a fairly sweet juice, but it so good.

This is a cloudy juice – you will not be able to see through the juice. Upon looking on the a few articles, it could be that this juice is better for you than it’s clear counterparts. The particles will settle as it sits and you can pour the juice off if you wish.

Monday, October 5, 2009

Cheesy Potato Soup


I came across a recipe in my Soup of the Day cookbook for Potato, spinach au-gratin Soup. Oh this sounded good, it got me thinking and I new I had to have a yummy potato spinach and cheese soup. I didn’t like all the cream in the given recipe so I went and did my own thing.

Ingredients:
~5 cups cubed potatoes
~2 cups chicken stock
1 cup chopped ham
2 cups chopped fresh baby spinach
2 tbsp butter
2 tbsp flour
1 cup milk (I used 1%, but I am sure any type of milk will work)
¾ cup grated old chedder
Salt
Pepper

Directions:
1. Place the potatoes into pot and just cover with the chicken stock. Cover and simmer over medium heat until the potatoes are tender.
2. As the potatoes are finishing cooking start making the cheese sauce by melting the butter in a separate pot. Once the butter is melted whisk in the flour. Slowly add the milk while whisking and let heat over medium heat until thick. Add the cheese to the white sauce and let melt.
3. Once the potatoes are tender, mash about 1/3 of the potatoes into the broth. Then pour in the cheese sauce and stir. Add the ham, spinach, salt and pepper.
4. Leave on the stove until the soup is heated through and the spinach is tender.
5. Serve.

Reviews:
This was an extremely yummy soup and the leftover were great as well. I look forward to trying this again with onions and bacon!

Cinnamon Apple Chips


Cinnamon Apple Chips

With 120lbs of apples sitting in my apartment, and knowing I could only make so many pies before my freezer and friends were full, I had to find other ways to deal with the apples. One of the people at work offered to lend me a dehydrator – this sounded like a fantastic idea, they would keep for quite a while and would be easy to store.

Ingredients:
4-5 Apples (I used both Gala and Mac apples. Both were tasty, so just pick if you would like something sweet or a little more tart).
½ to 1 tbsp sugar (prefer brown, but white is tasty as well)
1 tbsp cinnamon

Directions
1. Peel and core the apples. Slice into thin slices (I did all of this using my Apple Peeler, Corer Slicer – this little gadget has been a life saver for dealing with all these apples).
2. Sprinkle the rings of the apples with the sugar and cinnamon.

3. Lay on the trays of the dehydrator. Leave a small space between each of the rings so they won't stick together.
4. Dehydrate for about 6 hours at 135F. The apples will be dry but pliable when they are done (ie they shouldn’t be sticky to the touch or squishy, but won’t snap if you bend them).
5. Let cool to room temperature (they will become a little more crisp) and store in an airtight container.

Reviews:
Everyone has loved these chips, and they disappear quickly after I put them out. I am making a lot more of these than originally planned because they have been so popular.

Sunday, October 4, 2009

Carrot Cake


This year was great for carrots, and as I was on a roll with the baking, Mom requested a carrot cake. No problem I though and pulled up a couple of recipes, she then informed me that she wasn’t a fan of the recipes with pineapple, she wanted one with just carrots. Well that made things more interesting. Allrecipes came to the rescue and I ended up with a great cake.

Carrot Cake Adapted from Allrecipes
INGREDIENTS
4 eggs
1 1/4 cups vegetable oil
2 cups white sugar
2 teaspoons vanilla extract
2 cups all-purpose flour
2 teaspoons baking soda
2 teaspoons baking powder
1/2 teaspoon salt
2 teaspoons ground cinnamon
3 cups grated carrots


1 (8 ounce) package cream cheese, softened (room temperature)
1/2 cup butter, softened
3 cups confectioners' sugar
1 teaspoon vanilla extract
1/8 teaspoon salt


DIRECTIONS
1. Preheat oven to 350 degrees F (175 degrees C). Grease and flour a 9x13 inch pan.
2. In a large bowl, beat together eggs, oil, white sugar and 2 teaspoons vanilla. Mix in flour, baking soda, baking powder, salt and cinnamon. Stir in carrots. Pour into prepared pan.
3. Bake in the preheated oven for 40 to 50 minutes, or until a toothpick inserted into the center of the cake comes out clean. Let cool in pan for 10 minutes, then turn out onto a wire rack and cool completely.

Note for all you nut lovers out there, you can add 1 cup of pecans to the batter when you add the carrots, and you can add some to the frosting if you like. I did not do this, as my family isn’t a big fan of nuts in their baking.

To Make Frosting: In a medium bowl, combine butter, cream cheese, confectioners' sugar, salt and 1 teaspoon vanilla. Beat until the mixture is smooth and creamy. Do not frost until the cake is completely cool.

REVIEWS:
I halved this recipe as we already had a chocolate beet cake and multigrain cinnamon buns around the house, It made a lovely small cake that is a great option for when you just need a bit of cake.

My mother really enjoyed this cake and happily took it along to share with friends at a party that night. Owen managed to sneak a piece and while carrot cake isn’t his favorite he had no problem eating it and trying for more.

Chocolate Beet Cake


I have a confession – I am not a fan of beets. No matter how many times I try them, I just don’t like them. So this year, my mother as usual ended up with an abundance of beets in her garden. After helping with a couple batches of pickled beets, we were both done with the canning. Still having a sink full of beets however, we had to think of something. I did a little searching and came across Chocolate Beet Cake on Straight from the Farm. Hmmmmm, chocolate – I do love chocolate. Could this be the answer to my aversion to beets – sneek them into a chocolate cake?

I got to work pureering beets, hunting chocolate out of the cupboards and mixed up the cake.

CHOCOLATE BEET CAKE
vAdapted Straight from the Farm
1 c. margarine, softened, divided

1 1/2 c. packed dark brown sugar

3 eggs at room temp

3 oz. dark chocolate

5 medium beets/2 c. pureed beets

1 t. vanilla extract

2 c. all-purpose flour

2 t. baking soda

1/4 t. salt

1/2 t. cinnamon

1/4 t. nutmeg

confectioners’ sugar for dusting


To make beet puree,
1. trim stems and roots off beets and place in heavy sauce pan filled with water.
2. Bring to a boil and reduce to a simmer for 50 mins or until the beets are tender.
3. Drain off remaining liquid and rinse beets in cold water as they’ll be too hot to handle otherwise. Slide skins off, quarter the beets and place in blender or food processor. Pulse until a smooth puree forms. Let cool slightly before using in cake. Puree can be made several days in advance.
To Make the cake:
1. In a mixing bowl, cream 3/4 cup butter and brown sugar.
2. Add eggs; mix well.
3. Melt chocolate with remaining butter; stir until smooth. Cool slightly.
4. Blend chocolate mixture, beets and vanilla into the creamed mixture (mixture may appear separated).
5. Combine flour, baking soda , salt, cinnamon and nutmeg; add to the creamed mixture and mix well.
6. Pour into a greased and floured 10-in. spring form pan.
7. Bake at 375 degrees F for 50-55 minutes or until a toothpick inserted near the center comes out clean.
8. Cool in pan 15 minutes before removing to a wire rack.
9. Cool completely before dusting with confectioners’ sugar.

Reviews:
The cake came out really nice, with a slight red color to it, which I found really cute and appealing. So this cake was a great texture, really moist but not too dense. I loved that about the cake. The beet flavour was subtle, but sadly so was the chocolate. Next time I make this cake, there will be more chocolate!