Sunday, March 6, 2011

Max and Whiskers Quilt


I finally finished another quilt! The amazing thing - even though I have 3 other quilts in various stages of being worked on, I finished this quilt in 10 days! That is from the day I received the fabric for the quilt top to the day I gave it to the recipient. Amazing what I can accomplish when I ignore the rest of the house and use precuts!

I made this quilt using a moda jelly roll of the Max and Whiskers line by Basic Grey. From the first time I saw this fabric I knew I wanted to make something with it (I love all the cute animals on the prints), but couldn’t decide what to do with it - then I found the perfect project. I used the pattern by Sweetjane, which used exactly one jelly roll for the top (with very little scraps left over). I made a trip last weekend to the local quilt shop and found the backing and binding in the sale rack (bonus for me).


This was also the first time I tried free motion quilting! Yay, I am glad it turned out so well and it was so much easier than I thought it would be (got to love my new sewing machine that came in a couple of weeks ago).

Anyone curious as to why I was in such a hurry to finish this quilt or who it was for? Well this quilt was the perfect thing for the new addition to my household. She is a big sweety and arrived a couple of weeks ago. The fabric was too perfect for her and I needed something for her to cuddle with on the couch.

Meet Abbey (and her new quilt - isn’t she cute?). Abbey is a 10 year old Brittaney Spaniel who has come to retire as a spoiled house dog. She loves living in the warm house (especially since it has been -25 or colder for the last couple of weeks) and is soaking up all the attention she is getting. She used to have to share people attention with 5 other dogs, now she has two people all to herself and is taking full advantage of that!


Anyways, why does Abbey get a quilt? Because I broke down and decided I needed someone to keep me company on couch, we needed something for her to lay on. The backing fabric should hide her hair nicely (thankfully she has pretty much stopped shedding - for now).

Review of the quilt:
It is pretty busy, but it came together very quickly (the binding took me longer than anything else). It will be great for what I needed it for and it looks like Abbey enjoys it.

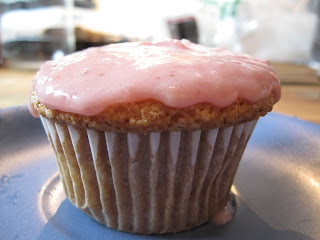
Strawberry Cream Cheese Icing


This a great variation of the cream cheese frosting but the consistency can be hard to achieve - especially if you don’t want to add more sugar and risking it getting too sweet. The key is to use real strawberries and concentrate the puree to remove most of the liquid but keep the flavour.

Ingredients:
½ cup of regular cream cheese frosting
½ cup of strawberries (you can add more or little depending on how much strawberry flavour you would like).

Method:
1. Wash the strawberries and remove the tops if using fresh (frozen works fine as well, as long as they are not in a syrup).
2. Puree the strawberries and put the strawberries in a pot. Turn the heat on low and let it simmer until it forms a thick paste. Be careful not to burn them!
3. Mix the cream cheese icing and strawberry “paste” together.
4. Frost and enjoy!


Note: If this seams a little runny to you then try putting it in the fridge, it will firm up if it is cool. If it is still too runny you can add more icing sugar to thicken it (this will make it a lot sweeter) or add try adding more cream cheese icing.

Reviews:
This icing is amazing, I love it. It would be good on anything.

I took it to work with Papaya cupcakes and it was definitely the star of the coffee break.

Saturday, March 5, 2011

Papaya Coconut Cupcake


I had some papaya in the fridge that I wanted to use and the oven was already on as I was baking some cinnamon buns for O’s work. What else could I do but try some cupcakes? I found a recipe on Chockylit but decided to make a couple of changes, mainly adding whole wheat flour.


Ingredients:
½ cup oil
2 large eggs
¼ cup coconut milk
1 ⅓ cup sugar
1 ⅓ cup all purpose flour
⅔ cup whole wheat flour
1 tsp baking soda
½ cup shredded coconut
6 ounces of pureed papaya

Method:
1. In a bowl mix together the oil, eggs and coconut milk.
2. Add in the sugar followed by the flour and baking soda.
3. Once the flour is mixed in add the coconut and papaya and mix until just incorporated.
4. Fill cupcake cups (the batter will be a little sticky) and bake for 22 minutes at 350F. The cupcakes will be golden on top and a toothpick will come out of the cupcakes clean.
5. Allow to cool, and enjoy!

Reviews:
I enjoyed this but am hesitant to call them a cupcake. The consistency of the cake is much more like a muffin than a light and fluffy cupcake. O thought they were a little bland, but no one else seemed to have that complaint (and I blame this on my papaya - seriously, why did I think I could get a flavorful, sweet, juicy papaya in the middle of Canada in the winter?).

I topped these cupcakes with a strawberry cream cheese frosting which is the hit of the day (it really stole the thunder from the cupcakes themselves) and the recipe for that will be coming shortly.

Sunday, February 27, 2011

Cream Cheese Icing

I know I said I would post this a while ago, and I am sorry for the delay.

This is just a general cream cheese icing that I use for many purposes - icing cupcakes, cakes or even dipping monkey bread into (yum!). I add different flavours depending on the occasion but I must say it is pretty good all on its own.

Ingredients:
1 block (8 ounce) cream cheese
½ cup butter
2 to 3 cups of icing sugar

Directions:
1. Make sure the cream cheese and the butter are soft and at room temperature, the longer they have been out the easier they will cream together!
2. Cream together the cream cheese and the butter. Slowly add 2 cups of icing sugar and mix in.
3. Now the fun part - taste the icing. Is it too tart - add a little more sugar, is it too runny - add a little more sugar (you get the idea).
4. Use however you wish (eating with a spoon is always an option, just not the healthiest route to go!).

Sunday, February 6, 2011

Lime Coconut Cupcakes


There was a birthday at work this past week, and I hadn’t baked anything in a while, so I figured that was a good enough reason to make something. I wanted something new, not the same old cookies or vanilla cupcakes. Also I didn’t want anything too sweet - that is for next week when Valentines Day hits (still have no idea what I am making for that one - pink cupcakes maybe?)

Anyways, I wanted something a little spring like and upon investigating the contents of my fridge I came across some lime juice. I love lime flavoured deserts and went on the hunt for a lime cupcake recipe. I came across Coconut Lime Cupcakes on the foodnetwork site and decided to try - along with my own modifications of course, I was looking for a lime cupcake not a coconut cupcake!


Lime Coconut Cupcakes (makes ~ 12 to 15 cupcakes)
Ingredients

3/4 cup (1 1/2 sticks) unsalted butter, at room temperature
1 cup granulated sugar
2 eggs, at room temperature
1 teaspoon pure vanilla extract
4 tablespoons lime juice (bottled or freshly squeezed)
1 1/2 cups all-purpose flour
1/2 teaspoon baking powder
1/4 teaspoon baking soda
1/2 cup buttermilk
1 cups loosely packed unsweetened shredded coconut


Directions
1. Preheat oven to 325 degrees F.

2. With an electric mixer (or a really strong arm) cream together the butter and sugar. The resulting mixture should be light and fluffy (don’t be afraid to let it beat for a couple of minutes to get it this way).

3. Add the eggs one at a time and mix until well incorporated. Add in the vanilla extract and the lime juice, mixing well.

4. In bowl combine the flour, baking powder and baking soda. Add ⅓ of the mixture to the wet ingredients and let mix. Add ½ of the butter milk, followed by ⅓ of the dry ingredients. Repeat once so all the milk and flour is used. Mix until a smooth mixture results.

5. Stir in the coconut.

6. Drop the mixture into cupcake holders, filling about ⅔ or ¾ of the way up. Bake for 20 to 25 minutes - until a toothpick inserted in the center of the cupcake comes out clean.

7. Allow to cool before Icing.

Reviews:
I used a cream cheese icing on these cupcakes and they were great. They got great reviews at work and I didn’t come home with any left! I will be making these again when I want something a little more spring/summery or just that hint of citrus!

Wednesday, January 19, 2011

Hashbrown Egg Casserole


It has been snowing here (a lot) and it has been cold. This combination has made my desire to go grocery shopping almost nonexistant. I have been trying to stretch the distance between shopping trips as much as I can, as all I want to do after work is to come home, curl up with a warm blanket and a good book while trying to stay warm. This recipe came up as a result of an almost empty fridge and a refusal to go out into the cold for more ingredients. It is a variation and mix of an old recipe I only half remembered and one found on allrecipes.com.


Hashbrown Egg Casserole
Ingredients
1 (32 ounce) package frozen cubed hash brown potatoes, thawed
1/2 pound sliced bacon, cooked and crumbled
1 cup shredded Cheddar cheese, divided
1/4 teaspoon salt
8 eggs
1/2 cup water
1 can evaporated milk
½ onion chopped, cooked until soft


Directions

1. In a large bowl, combine hash browns, bacon, 1/2 cup cheese and salt. Spoon into a greased 13-in. x 9-in. x 2-in. baking dish.
2. In a bowl, beat eggs, water, salt, pepper and evaporated milk milk until smooth.
3. Pour the egg and milk mixture over hash brown mixture. Sprinkle with paprika.
4. Bake, uncovered, at 350 degrees F for 45-50 minutes until golden.
5. Top with the remaining cheese.


Reviews:
Oh, I love this for a change for supper. I rarely have the time or the desire to cook hashbrowns and bacon in the morning despite my love of them. This recipe is so simple and has endless changes that can be made to make it fit my mood for the day - adding vegetables such as chopped peppers, or switching the cheese. I do love a little jalapano montery jack in this - gives it a little kick. The egg taste is very mild to not really there (unless you are looking for it), which is a bonus for me.

Velvet Cupcakes


I have always loved red velvet cupcakes, but never tried making them myself. When I saw the recipe for velvet cupcakes in Jamie Oliver’s new cookbook I thought I would give it a try. After a few batches and a couple of changes (due to the horribly dry climate I live in mostly) and a couple of “ooops” moments, here is what I ended up with.

Makes 12 cupcakes
¼ cup butter (rt)
¾ cup powdered sugar
1 lg egg
1 tsp vanilla
3 tbsp red food colour (optional)
2 heaping tbsp cocoa powder
1 ¼ cup flour
½ cup buttermilk
1 tsp baking soda
1 ½ tsp white vinegar
3 tbsp oil


Directions:
Heat oven to 350F

1. Cream together the butter and sugar until smooth and fluffy. , Gently beat in egg, vanilla and food coloring.

2. Whisk together cocoa and four. Fold half into the butter mix, followed by buttermilk. Repeat for remaining flour and milk.

3. In a bowl mix the baking soda and vinegar, stir into cake mix.

4. Divide into 12 liners in muffin tins, bake for 20 minutes. Cool 5 minutes in the pan then transfer to a wire rack.

Let cool before frosting.

Reviews:
Even after playing with the recipe, the cupcakes were denser than I would have liked. However I seem to be the only one that had an issue with the cupcakes - everyone else loved them (even when I had an oops moment and used apple cider vinegar!). This is a good cupcake, but won’t be my go to recipe.