Tuesday, July 27, 2010

Chocolate Cupcakes, White Chocolate Icing


The chocolate cupcakes

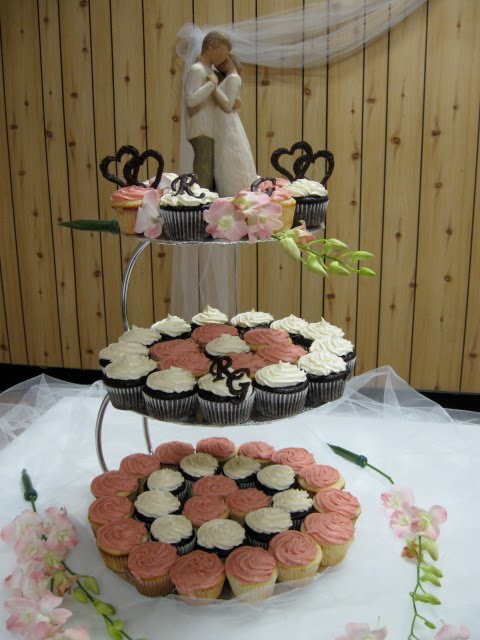
For the wedding I decided to do a twist on the chocolate cupcake – a chocolate cupcake with a white chocolate icing (who doesn’t love chocolate on more chocolate). For the cupcakes I used a one bowl chocolate cupcake recipe from iheartcuppycakes. I adapted the recipe for the icing from Cupcakes take the Cake

Chocolate Cupcakes:

Ingredients:
1 ½ cup flour
¾ cup cocoa powder
1 ½ cup sugar
1 ½ tsp baking soda
¾ tsp baking powder
2 large eggs
¾ cup milk
3 tbsp vegetable oil
1 ½ tsp oil
¾ cup warm water

Directions:
1.Preheat the oven to 350F and prepare your cupcake pan (this recipe doesn’t take long to put together).
2.On medium speed of an electric mixture (or by hand) combine flour, cocoa, sugar baking soda, baking powder in a bowl.
3.Reduce the speed and add in the eggs, milk, oil, vanilla and water. Mix until combined.
4.Fill cupcake liners ½ to 2/3 full (I put about ¼ cup cup of batter, not scraping out what sticks in the cup) into a large cupcake liner and this works well.
5.Bake 17-20 minutes, until a toothpick comes out clean.
6.Let cool on a wire rack before icing.

White Chocolate Frosting:

Ingredients:
12 tablespoons unsalted butter, softened
5 cups confectioners sugar, sifted
4 - 5 ounces white chocolate, melted and cooled to tepid
1/3 cup milk, heated to tepid
1 tablespoon vanilla extract

Directions:
1.In a bowl beat the butter for 1 -2 minutes (works best with the paddle attachment of an electric stand mixer on medium speed).
2.Beat in 1 1/3 cup sugar.
3.Mix in the melted chocolate.
4.Blend in 1 1/3 cup of sugar and the milk.
5.Beat for 2 minutes on medium high speed.
6.Beat in the vanilla and 1 1/3 cup of sugar.
7.Beat for 2 minutes and check the consistency – if it is not thick enough (mine was not) add the remaining icing sugar ¼ cup at a time until it reaches the desired consistency.
8.Frost cupcakes.

Reviews:

These cupcakes were delicious and were a big hit at the wedding (especially with the kids!)

I used the leftover icing to fill some chocolate oreo cookies and they were fantastic!

Sunday, July 18, 2010

Cupcakes and a Wedding


So the last few weeks I have been busy making cupcakes, testing icings to see how they stand up to the heat without losing it's shape (or melting all together). Why all the testing and baking? Well in a moment of insanity I offered to bake the cupcakes for my friends wedding. Why on earth did I think that was a good I deal, well I guess I will never know. But I ended up making about 100 cupcakes, icing them, transporting them 1.5 hours to the wedding, and setting them up before driving another 20 minutes to try and make the ceremony in time! Thankfully I got there in time, the icing didn't melt and nothing was destroyed in transport.


I ended up making a chocolate cupcake with a white chocolate icing and a vanilla bean cupcake with a strawberry buttercream icing. They were pretty, and held up well. Everyone seemed to enjoy them.


So I hope you enjoy the pictures and I will hopefully get the recipes up soon!

Pheasant Quilt


So sorry for the delay in getting this up (it has been done for a few weeks, and is residing in my parents living room now). I will get to the reason for the day in the next post (I promise I have a reason!).

Anyways, I got the quilt for my Dad done (albeit a little after father's day). He loves it and it goes well with the chair. Oh, and he had to try it out as soon as it arrived, despite the fact that it was the end of June and in the 20s (that is C) outside.


The quilting projects seem to be piling up quicker than I can get them done. I have a sock monkey quilt that will be finished in a couple weeks (just waiting to get the time to do the binding), doll quilts for some of my cousins, a quilt for my mother (fabric is on the way) and some small projects for a friend of mine. I can't wait!

Wednesday, June 30, 2010

Quick Cheesy Pasta


I was short on time making supper one night and needed something to go with our grilled chicken. I had no pasta sauce of any kind in the house and so decided to try something for a creamy cheesy side. It took only minutes and turned out great.

Ingredients:
Pasta
¼ cup milk (I used 1%)
2 Laughing cow light cheese
1 tsp Italian seasoning.

Directions:
1. Cook pasta according to the package instructions.
2. Drain the pasta and place it back in the pot. Over low heat add the milk, cheese and seasoning.
3. Stir the pasta until the cheese has melted and the pasta is coated.
4. Serve and enjoy.

Reviews:
This turned out great! It was quick and easy, but oh so creamy and delicious. You would never guess that I made it with light ingredients.

Tuesday, June 29, 2010

Banana Boat Cookies


I loved Banana boats as a kid (bananas filled with mini marshmallows and chocolate chips, mmmmmmmmm) but sadly only have them while camping (I will have to remember to post those sometime this year). Well I always get a craving for them at some point during the year when I just can’t make them – winter or when the first signs of spring are coming out, so I decided to make a cookie to try and replicate them. What I came up with is a soft delicious banana cookie filled with chocolate chips toped with toasted marshmallows.

Ingredients:
½ cup butter (room temp)
1 cup sugar
1 egg
1 cup mashed bananas (2-3 bananas – I like to use 3 big bananas and not care if it is a little over. The riper the bananas, the stronger the flavour)
1 tsp baking soda
2 cups flour
1 cup chocolate chips
Mini marshmallows

Directions:
1.Preheat the oven to 350F while you make the dough.
2.Cream the butter and sugar until light and fluffy. Beat in the egg until it is light and fluffy.
3.In another bowl mix the mashed bananas and baking soda, let sit 2 minutes.
4.Mix the banana and butter mixtures.
5.Add the flour until just combined – don’t overmix.
6.Fold in the chocolate chips. Drop cookies onto a cookie sheet, top with 1 mini marshmallow.
7.Bake for 11-13 minutes (will be golden) and let cool on wire racks. While cookies are still warm press another marshmallow into the top of the melted marshmallow in the cookie.
8.If you would like to go the extra little bit, you can put the cookies under the broiler for a few seconds to toast the top of the marshmallow – devine!

Reviews:
Oh, how I love these little delights, so moist and delicious. Oh, and there is bananas in them, so I can almost trick myself into thinking they are healthy – right?

The first batch of these I made were supposed to go to the bulldogs during their season, but somehow ended up at the team Captain’s house and never made it to the game, hmmm.

Monday, June 28, 2010

Grilled Salmon Steaks


For Father’s day, we were visiting with both sets of parents. O and I decided that for a special treat for the parents we would pick up some fresh fish at the local fish market and grill it for them. They had some great looking salmon that we picked up and took home. I decided to marinade the steaks before grilling them and found a great looking recipe on all recipes. I changed the recipe a little just to make it easier and so I had to handle to fish less – I am not a huge fan of fish.

Ingredients:
1 ½ lbs salmon ( I used steaks)
Lemon pepper to taste – about ½ to 1 tbsp
1 tsp garlic powder
1/3 cup soy sauce
1/3 cup brown sugar
1/3 cup water
¼ cup vegetable oil

Direction:
1.Mix together the lemon pepper, garlic powder, soy sauce, brown sugar, water and vegetable oil.
2.Pour the marinade into a large Ziploc bag and add the salmon. Press out the air and seal. Marinade in the fridge for at least 2 hours (I had mine in for a few more hours).
3.Grill the salmon over medium heat on the grill, until it flakes easily. Don’t overcook or it will become dry.

Reviews:
Everyone loved the salmon! The marinade was simple and didn’t overpower the fish. It was a big hit and some people thought it was better than any salmon they had ever had a restaurant.

Saturday, June 26, 2010

Citrus Ginger Spice Cookies


I received a cookie press and off course I had to try it out right away. Upon flipping through the book that came with the press I came across the recipe for ginger cookies, and had to try them. Now, first, these are not a ginger snap, nor a molasses cookie, but a more citrus like cookie.

Recipe:
1 ½ cup all purpose flour
2 tsp pumpkin pie spice
1 cup room temp butter
¾ cup packed brown sugar
1 tbsp orange zest (zest of 1 large orange)
1 tsp vanilla extract
2 eggs

Directions:
1.Preheat the oven to 350F while you prepare the dough.
2.Mix the flour and pumpkin pie spice together and set aside.
3.Cream the butter and sugar together, add the orange zest and vanilla extract and mix until light and fluffy.
4.Beat in the eggs. Mix in the flour and spice mixture. The dough will be soft.
5.At this point either pack into the cookie press and press cookies, or spoon on to a cookie sheet (cookies should be small).
6.Bake for 12-15 minutes. The cookies should be just firm to the touch. Cool and enjoy.

These cookies made the kitchen smell so good. I loved it. The cookies were a big hit, even though they were not a traditional ginger cookie. The one comment I did get was that they went great with either a glass of milk or coffee – whichever you are into.

Despite this being a recipe for a “cookie press” I am sure it would work fine with just spooning out small teaspoon sized cookies.